
How To Edit Painterly Wave Photos (Lightroom Secrets)


Capturing painterly wave photos is only half the battle.

To make your painterly fine art wave images really stand out you have to learn the right editing techniques.
In this Lightroom. tutorial, learn how to edit painterly wave photos using the real secrets to taking your fine art wave photography to the next level.
We break down the exact editing steps in Lightroom Classic to transform a raw file into a stunning, painterly masterpiece.
Grab a drink, grab your favorite wave image (or the one below!), and let's jump in!
First, I will show you exactly what to look for to find the best raw images for this effect. Then, we will dive deep into the full editing process including basics, balance, masks and color.
Download this RAW file to follow along: Grab the file right here (Google Drive Link)


Alright let's dive in!

Choosing The Perfect Painterly Wave Photo
It takes many, many attempts to dial in the right combination of shutter speed, body movement, wave movement, framing of your subject, focusing and firing off the shutter button all in one artistic dance.
But after you capture so many images how do you find the best wave to edit? What should you look for exactly?


Well, first chose the images you are drawn to artistically, but here is exactly what i am looking for beyond shape and form.
I want that painterly soft feel throughout the photo, but I need to find sharpness in the wave crest and spray too. This combination of blurry painterly and sharp brush stroke type pieces all combine while the, longer than usual shutter, is open to create a perfect balance.

Editing Painterly Wave Photos in Lightroom

Now that we have our chosen wave photo it's time to transform it into a masterpiece with these editing techniques.
But first we have to get our base exposure and balance correct.
Set Your White Balance

Set your starting White Balance first. Select AUTO, adjust manually or leave it as you photographed it. I matched the colors I was seeing the day of the photo for now. We will cover color adjustments shortly. but first...
Global Balance: Exposure, Highlights and Shadows.
Adjust your image to get a good base exposure. Adjust exposure, bring down highlights and boost shadows. What you want is a mostly even image to work with.

Check your histogram to ensure everything is properly in range with no clipping.
Clean Up Your Image: Sensor Dust & Debris
Now is the time when you want to clean up your image of any sensor dust or debris.

With this type of image stay away from the spot healing tool which can be hard to get right with these wave curves and tones. Instead use the newer AI healing tool. It takes a bit longer, but the results are much cleaner.
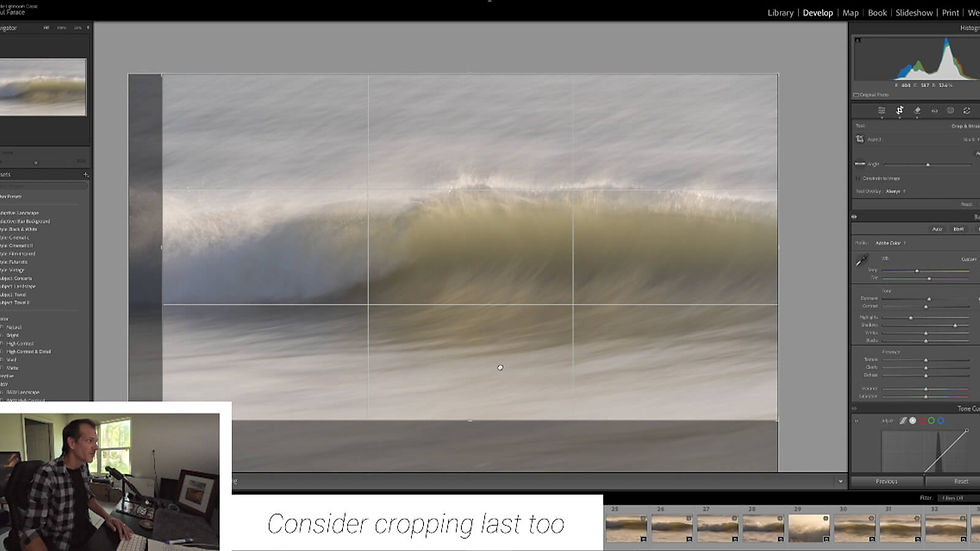
This is when I cropped my image, but consider cropping last to save if you need to at all. That will ensure you save the most data and can make that choice once everything is further edited. For this image I already knew my final crop so I went ahead.
Ok so we have our image balanced with a great bas exposure. Let's get into the good stuff.
Using Lightroom Masks (Gradient, Brush & Intersecting Masks)

Linear gradient masks
First thing I want to do is darken the tops and bottom of the image with linear gradient masks. The top is a bit more tricky and I will show you that next, but I use these to darken instead of a usual vignette. This is to avoid dark corners and have more control over the adjustments for this specific image.
The top gradient mask is a bit more tricky because we have the bright water spray over the background. So how do we address that?
Intersecting Mask with Luminance Range

Once you have your linear gradient mask set for the top go to the mask menu...
Click the three dots next to your mask
Hover over "Intersect Mask With"
Choose Luminance Range near the bottom of the menu.

Once you have that selected, adjust the highlights slider of the range SLIGHTLY down until only the brightest spray starts showing through.
Now we can darken the top without affecting the water spray off the top of our wave,
Our main goal is to direct the viewers eye exactly where we would like it to go.

People naturally gravitate to the brightest parts of an image first and we want that to be our main subject, not the background!
So now that we have our wave elevated on the image we can really start to target the masks, but which ones do you use?
Brush Masks to Target The Main Subject

Add another mask and select 'Brush' type.
Always keep your feathering high for a more natural look.
Flow is just like opacity. Sometimes it can be better looking to set one of those lower and do several passes, again more control.
The more subtle and natural each edit the better end result.
Once I have my wave selected how I like I bring up the exposure, but just a little. These types of masks can look very unnatural if you go even a little bit too far.
Side note: You can also try using a Radial Gradient as an oval over your wave section for a natural look on this section.
Clarity & De-Haze

With that same mask I add a bit of Clarity and De-haze to the wave. Keep this very subtle because we will target sections of the wave next. We just want to make it pop by adding a little bit of contrast through these controls.

Target the natural light.
Using another brush mask I paint over the wave crest and light in the center of my wave to enhance that specific section. I add a very subtle exposure boost to bring them out and draw focus.

Use continuously smaller brush or other types of masks to target the sections you want to enhance.

Continue refining and try your best to only do subtle adjustments. Here I am targeting only the wave crest and adding contrast, clarity and sharpening.
A good rule of thumb I like to use from my music production years is adjust it until you like it, then back it down 25-50%.
Now the fun part....

Tweaking colors in Lightroom
This is the type of image where I think you have a full creative liusence to take the final image where you want.
Some like a natural look to the day and some like to go crazy. Here is how to tweak the colors of your wave image with control.
Global Color Adjustment: Color Calibration Panel

First try out the Color Calibration panel at the very bottom of your Lightroom tool panel. This will adjust all of your colors simultaneously. Try bringing the green slightly over to the right.
Another good color grade is to bring the red and blue channels slightly left. This will give you the classic orange and teal Hollywood style colors.
But these controls adjust everything at once in relation to the other colors. To really take control you need to target each color individually.
HSL in Lightroom: Hue, Saturation and Luminance

The HSL, or Hue, Saturation and Luminance sliders, give you precise control over each color.
In my image the strongest color is yellow due to the sunlight back lighting the wave.
Grab the Yellow Hue Slider and adjust to see the changes you can make. Or if you are using your own image, whatever color is dominant. Expiramentation is key here. Have fun, push it way too far just to see how it affects the image.

Grab the Yellow Luminance Slider and push it up a bit to brighten the section and draw the eye to the light falling on and through the wave.

But while the blue green was cool in this image, I ended pushing the image towards yellow to emphasize the sunrise light shining through. After a bit more tweaking, darkening and emphasizing the light we came to a good place with the edit.
And don't forget to de-noise if you need to, my image benefitted from it because I pushed the the edit pretty far.

And here is my final painterly wave edit.
I hope you enjoyed this painterly wave editing tutorial! I'd love to see your images or your version of this one! Drop a comment and let me know!
If you would like to check out the video on YouTube where I walk you through each step right here: How To Edit Painterly Wave Photos (The Real Secrets)
If you enjoyed this here is a sunset editing video to check out!

All images and words by Paul Farace Photography
Paul Farace is an award winning Florida based landscape photographer and author with 20 years of experience, specializing in capturing the state's coastlines and waterways. Operating out of St. Augustine, he shares his expertise through fine art prints, adventure videos, educational workshops, and digital content. Explore his work and bio details at Paul Farace Photography.
Connect with me!
---------------------------------------
Check out my THIS IS FLORIDA! series on YouTube where I am exploring the full length of Florida's A1A in search of the best landscape photography spots.
Some links on this page are affiliate links and I may earn a small commission if you use any to buy. An easy way to support me for free! Thank you!
My Stuff
My Website: https://www.paulfaracephotography.com/
100+ Ideas for Landscape Photographers Book: https://amzn.to/4cinISm
How to Extreme Focus Stack Ebook: https://amzn.to/48wEgon
North East Florida Guide: https://www.paulfaracephotography.com/florida-photo-guide
Marineland Seascape 1on1 Guide: https://www.paulfaracephotography.com/marineland
My Gear
My cameras: https://amzn.to/4vgrOTL
My wide angle lens: https://amzn.to/3QfoRTf
My mid range lens: https://amzn.to/4sV4U2y
My telephoto lens: https://amzn.to/48bU687
My drone: https://amzn.to/3PVgdt7
My action cam: https://amzn.to/4t2Knck
My microphones: https://amzn.to/4dE4n0a
My ND filter: https://amzn.to/4c2cLWe
My circular polarizer: https://amzn.to/41XllQ0

Comments